Tables
Create and work with database-style lists using columns, statuses, group-by, and the list, kanban, and calendar layouts.
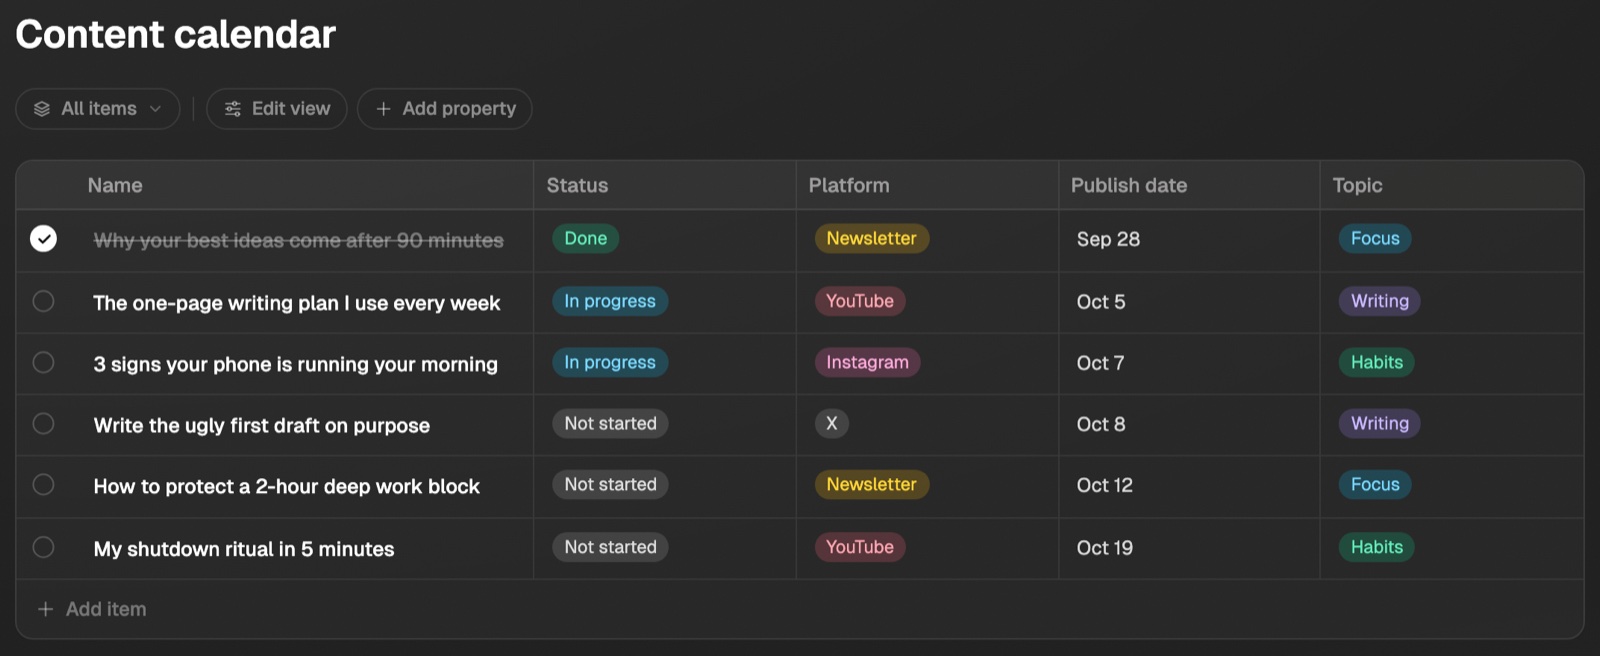
A table is a list with structure: rows you can check off, columns you define, and layouts that turn the same list into a kanban board or a calendar. Use tables for organized information (a content calendar, a to-do list, a hook bank) and notes for everything else.
Creating a table
You can create a table wherever you create anything else:
- On a board, right-click the canvas and pick Create a table, or open the + menu in the board's toolbar and choose Create → Create a table. The new table appears as a card on the board.
- On a board, press Shift+T to drop a table without opening any menu.
- In Library, open the create menu and choose Create a table, or press Shift+T. The table lives in your Library and opens right away.
- From anywhere, press
⌘ K(Ctrl Kon Windows) and pick New table from the Actions list. The destination control chooses where it lands — Library, or any board. The table opens full screen in the main pane; hold Option (Alt) and press return to open it in a side pane instead. - From a template: Settings → Templates holds table templates, so a new table can start with your columns already in place.
- In chat, ask Eve to build one: "make me a content calendar table with status and publish date columns." Claude and other connected agents can create tables the same way through the Eden tools.
- On mobile, tap the + button in Library or on a board and choose New table. The table opens right away, ready to name and fill.
- On mobile, tap Start a table on the Home screen (or pick Table in the capture sheet's Saves as row). Type the table's name, then type a line per row — each line becomes a row, and return starts the next one. Saving opens the finished table.
Rows
Every row is a real item in your workspace. Click a row's title to name it, click the circle to mark it done, and drag the handle in the left gutter to reorder rows.
Add item at the bottom of the table creates a blank row you type into. Open the chevron beside it and choose Add from library to pull in something you already saved — a note, a saved link, a social post, a PDF — so the table can track things that live in your Library. Linked rows show a small type icon next to their name; click the icon to open the item itself. You can also link a typed row to a library item later: hover its name and click the @ button.
The @ button opens a short menu, because "link" means a few different things. New document from this row and New table from this row make a real item named after your row text, link it, and open it in a pane, so nothing gets renamed. Link an existing item points the row at something you already have, and the row takes that item's name. Add a related item puts the item in an item column as a chip instead, leaving your row text alone.
Once a row is linked, its name belongs to the item, so clicking the name opens the item instead of editing text. Rename it inside the item and the row follows.
On iPhone and Android, a linked row shows its item's type icon next to the name; tap the icon to open the item. Its name isn't editable there either, and tapping the name inside the row sheet opens the item. Creating and linking stay on the web app.
You can fill a table without touching the mouse. While you're typing in a cell, Enter saves and
drops you into the cell below, Tab moves across to the next cell on the right, and ⌘ Enter
(Ctrl Enter on Windows) saves and starts a brand new row right underneath the one you're on, with
your cursor already in it. The shortcut shows next to Add item while you're editing a cell.
Tab crosses every column, not just the text ones, and each type opens the way you'd expect. Land on a select or a date and its picker opens right there: arrow keys move through the options (on a date, left and right move a day, up and down a week), Enter picks, and Tab closes it and carries on to the next cell. Land on a checkbox and Space ticks it. Land on a priority rating and left and right change the stars, or just type the number. Arrow keys move between cells too, so you can walk the whole grid from the keyboard.
On iPhone and Android, tables work like a todo app. Tap + and the row card opens with your cursor already in the name, so you can just type. Tap the ✓ in the top right — or just hit return on the keyboard — and that todo is saved and a fresh empty one opens straight away, keyboard still up, so you can rattle off a list without ever closing the card. An Saved to table confirmation slides in each time. Tap the ✕ when you're done. An empty row you never named is thrown away rather than left behind.
The row card also has Today, Tomorrow, and Next week buttons under the name, so setting a due date is one tap. Tap the one it's already on to clear the date.
Removing a row doesn't destroy anything: it moves to a removed list you can restore from, in the table's ⋯ menu.
Columns
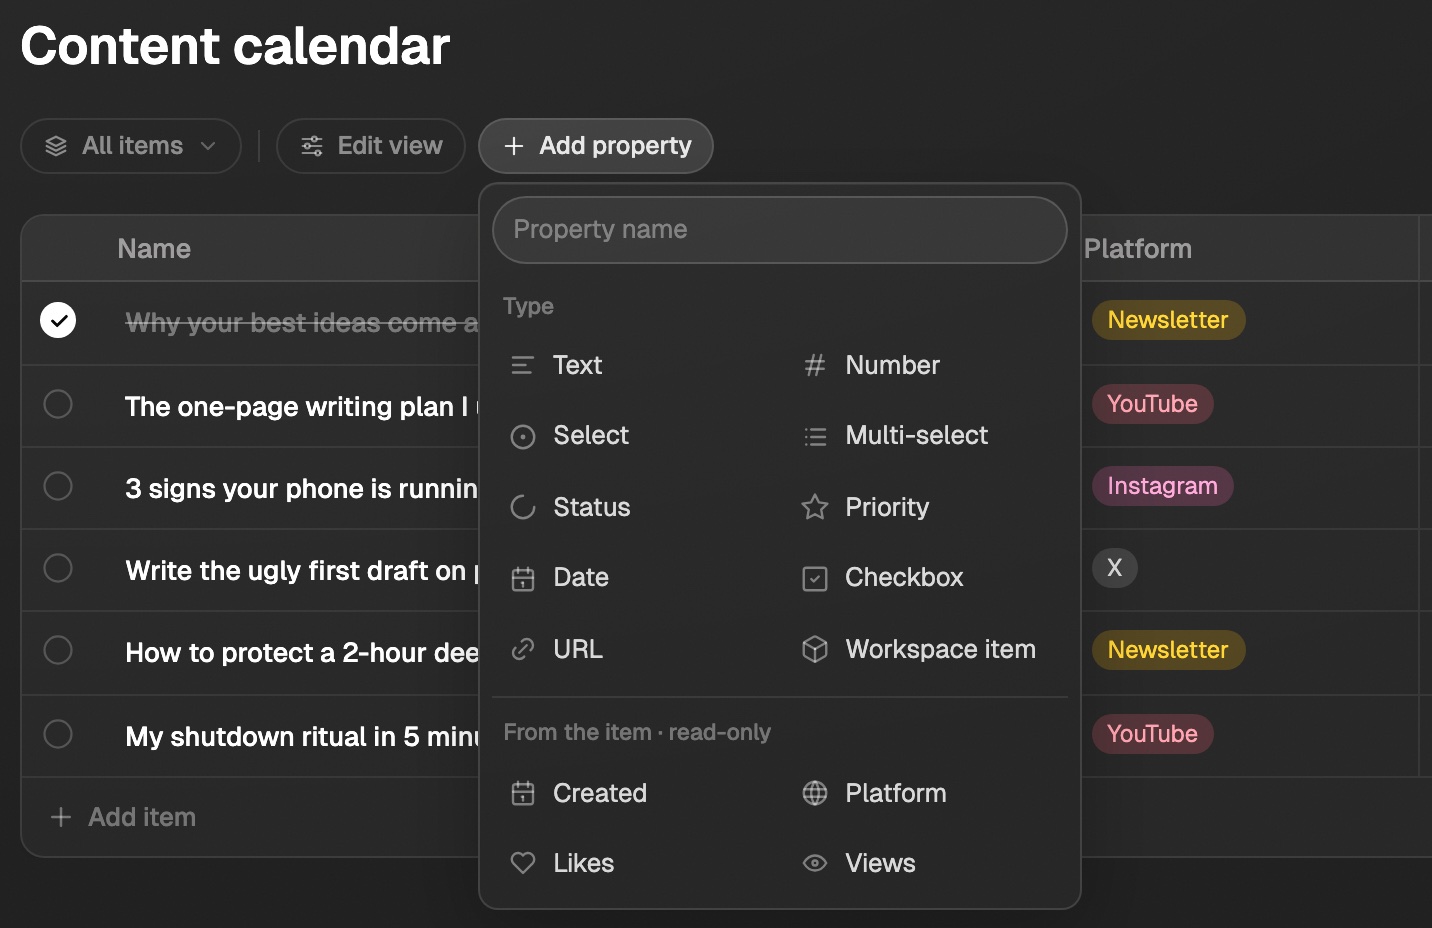
Click + at the right edge of the header to add a column. Column types include text, select (one choice from a list), multi-select, date, checkbox, priority rating, and a link to another workspace item — including a whole board. Clicking a board chip opens that board.
Click an empty workspace-item cell to search everything you have saved. Use the All, Documents, Images, PDFs, Boards, and Social tabs to narrow the list. You can also choose New document, New table, or New board (or type its name first): Eden creates it, links it in the cell, and opens it in the appropriate pane so you can keep working immediately.
Tables can also show read-only columns that fill themselves in, like Created, and for saved social posts, Platform, Likes, and Views.
Deleting a column is also reversible from the ⋯ menu.
You don't need the table layout to manage columns. In list, board, and calendar layouts, Add property sits in the top bar, and the row panel does the rest: open any row, click a property's name to rename it or delete it, and use Add property under the fields to add a new one.
On iPhone and Android, open a table and tap the sliders icon in the top right, then Add property. You can also add one from inside a row: open the row and tap Add property under its last field. Pick a name and a type, and for select or multi-select type an option and tap + (or the keyboard's return key) to add it as a chip, one at a time. Tap a chip to remove it. Renaming, retyping, and deleting a column stay on the web app.
Option colors
Every select and multi-select option gets a color when it is created. To change one, click a cell in that column to open its list, hover the option you want, and click the ⋯ that appears. Pick from gray, amber, green, blue, purple, or red. Gray is the one to use for a value that means nothing has happened yet, like Not started or Idea.
The color belongs to the column, not the row, so changing it repaints that option everywhere it shows up: every cell, the kanban lane header, and both phone apps.
To remove an option entirely, open the same ⋯ menu and choose Delete option. Select cells using it become empty; multi-select cells lose only that option and keep their other tags.
On iPhone and Android, open a row, then touch and hold an option chip to pick its color.
Selecting rows
The quickest way to grab several rows is to drag down a column — see selecting a block of cells below. The bar that appears acts on those rows.
For one row on its own, drag down a single column across just that row. Press ⌘ A (Ctrl A on
Windows) in a fullscreen table to select every row at once.
Either way, a bar appears at the bottom with Mark done, Duplicate, and Remove. Removing is reversible from the table's ⋯ menu.
Hovering a row also shows a six-dot handle in the gutter on its left. Drag it to reorder the row. The handle disappears while a sort is on, because a sorted table decides its own order — clear the sort from the Sort pill to go back to arranging rows by hand.
Selecting a block of cells
Click a cell and drag to sweep a block, the way you would in a spreadsheet. Drag in any direction — up, down, or across columns — and the cells you cover get highlighted.
Once a block is selected:
- If it stays within one property column, click any selected cell to open its normal editor. A status, select, multi-select, date, checkbox, rating, or text change applies to every selected cell. Select and date pickers tell you how many cells they will update. In a multi-select, choosing an unchecked tag adds it to every cell; choosing a checked tag removes it from every cell while leaving their other tags alone.
- Press Delete (or Backspace) to empty every cell in it at once. Names, dates, statuses, ratings, checkboxes — all cleared in one go.
- Press
⌘ C(Ctrl Con Windows) to copy the block. It pastes into Google Sheets, Excel, or Numbers as real rows and columns. - Use the arrow keys to move the selection, or hold Shift and press an arrow to stretch it.
- Press Escape to let it go.
A bar appears at the bottom with the same actions. Right-clicking inside the block offers them too.
It's also how you act on several rows
The bar counts two things: the cells you swept, and the rows they span. The right half of it acts on those rows.
So to work on four rows, drag down any column across them and use Mark done, Duplicate, or Remove in the bar. Removing is reversible from the table's ⋯ menu.
Clear and Remove are different on purpose. Clear empties the cells and leaves the rows where they are. Remove takes the rows out of the table.
Repeating dates
A to-do list needs tasks that come back. Click any date cell, open Repeats at the bottom of the date picker, and pick how often: every day, every weekday, every week, every two weeks, every month, every year, or your own Every N days / weeks / months / years.
A repeating cell shows a small ↻ next to the date. Hover it to read the rule in plain English.
Check the row off and it does not disappear. The date jumps to the next occurrence and the circle clears, so the same row serves the task forever. A toast tells you where it landed and offers Undo. Nothing new is created, so a daily habit is one row, not 365.
Two details worth knowing:
- Finishing late does not shift the schedule. A task due every Monday stays on Monday even if you tick it off on Wednesday. And the next date is always in the future, so a task you finish three days late comes back tomorrow, never in the past.
- Some things should count from when you did them. Watering plants "every 3 days" means three days after the last watering, not after a date you missed. Turn on Count from when it's done in the same menu for those.
Repeats live on the row, not the column, so a couple of tasks in a list can repeat while the rest do not. Duplicating a row carries its repeat with it.
In Calendar layout you see every occurrence, not just the next one. The real row sits on its own day as a normal chip, and the days ahead show a faded outline chip with a ↻ so you can see the shape of your week at a glance. Those previews are drawn, not stored — you cannot drag one to a different day, because moving a single occurrence is not something a repeating row has. Click one to open the row and change the rule.
Table, list, and board layouts stay clean: one row, on its next date, the way a to-do list should read.
On iPhone and Android, open a row and tap Repeats under any date to set or clear the same rules. Repeating dates show the ↻ on row cards there too, and checking a row off rolls it forward exactly as it does on the web.
On iPhone and Android, dates read in days rather than calendar dates: a row shows Today, Tomorrow, Yesterday, or the weekday name for anything in the coming week, and a date that has already passed on an unfinished row shows in red.
Filtering by when
Date filters understand today, tomorrow, and yesterday, not just a fixed calendar day. That is what makes a saved view keep working: "Due is on today" is still right tomorrow.
Open Filter in the top bar and pick a date column. The useful combinations:
- Due today → is on → today
- Overdue → is before → today
- This week → is in the next → 7 days
- Nothing scheduled → is empty
- Just the habits → repeats → Yes (or No for one-offs)
Every column type also has is empty and is not empty, including the Name column.
Save the combination as a view from the views bar and it becomes a tab you can click any morning.
Group, list, board, and calendar layouts
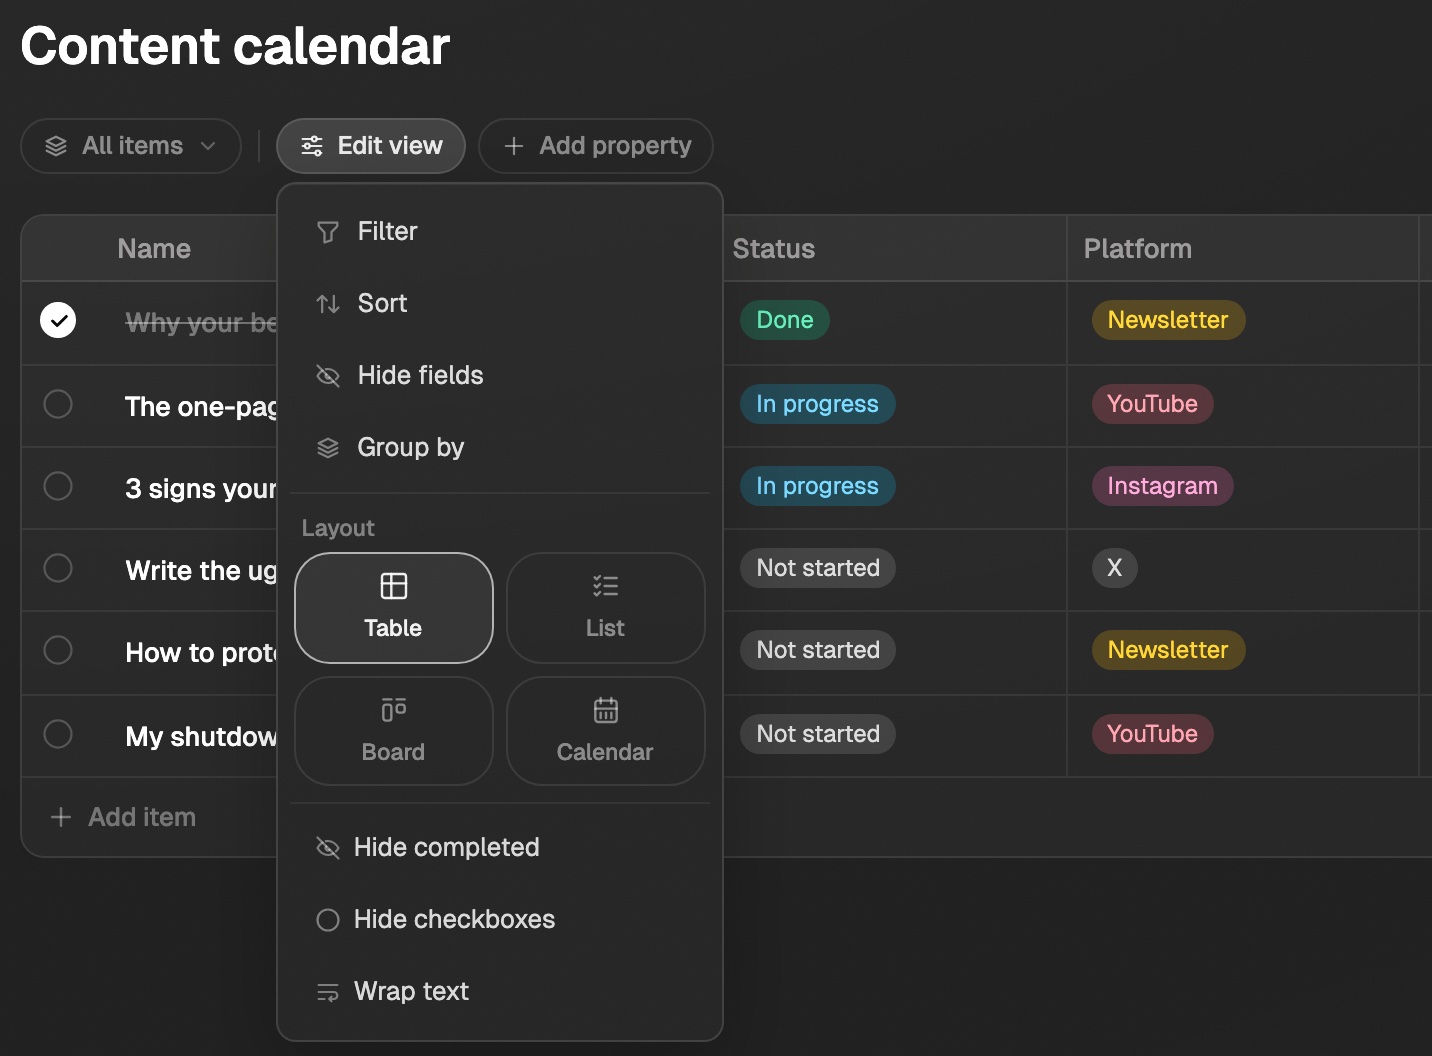
The layout menu in the table's top bar changes how the same rows are shown:
- Table is the default list. Add a Group by to split it into sections by done state, a select column, a rating, a checkbox, or a date. Grouping by a date gives you Overdue, Today, Tomorrow, This week, Upcoming, and No date.
- Collapse a section to get it out of the way — collapse Upcoming and only what's due is left. Collapsing is yours alone: it stays collapsed when you come back, and nobody else's view changes.
- List is the to-do shape: one line per row with its check circle, its title, and a short
trail of its status, links, and stars, with the due date in its own column on the far right.
Click the circle to check it off, click the title to rename it in place, and press Enter to
start the next item underneath. While you're typing,
⌘ Enter(Ctrl Enteron Windows) opens the row's panel with your cursor in the name, so you can set the status, date, and everything else without touching the mouse — the shortcut shows at the end of the line while you type. Click the trail to open the row and edit the rest. Drag a line to reorder it, or drop it on another group to change its status or move it to Today. Switching to List with nothing grouped picks your first date column for you, so you land on Overdue / Today / Tomorrow straight away. - A row linked to a library item shows that item's icon instead. Its name belongs to the item, so the list won't rename it — click the icon or the title to open the item in a pane and rename it there.
- Groups reorder by dragging their heading — the tab above a table group, the label above a list group, or a kanban lane's header. That order is the column's own option order, so every layout and every select menu follows it. Only status-style columns reorder; done, dates, ratings and checkboxes have a fixed order of their own.
- When a table or list is grouped by a select column, use Add [group] below the final section to create another option without leaving the layout. Hover a group heading and click ⋯ to rename it or change its color. Computed groups such as dates and Completed do not have these controls because their names and order come from the grouping rule.
- Board turns each group into a kanban lane. Drag a card between lanes to change its status, or, when you group by a date, to move it to Today or Tomorrow.
- Calendar places rows on a month grid using a date column. Drag a row to a different day to reschedule it. Repeating rows also show a faded preview chip on every day they are due.
The table's preview card on your board mirrors whatever layout you picked: a mini list, mini lanes, or a mini month.
On a freeform board, the card shows the live table itself. Double-click it to edit right there — rename it, add rows, change cells — without opening it. Press Escape or click the canvas when you're done, or hover the title row while editing and use the arrow button to open the table fullscreen.
Add a table inside a note
Type / in a note and pick an option from the Tables group to drop a full table right into
the page. Table view creates a new table in your Library that lives inside the note — you can
name it, add columns, and fill in rows without leaving what you're writing. Board view and
Calendar view do the same but start the new table in that layout, and Table from library
embeds a table you already have instead of creating a new one.
It's the same table everywhere. Edits sync both ways: change a row inside the note and it updates in Library and on any board the table sits on, and vice versa. Use the hover controls on the block to open the table fullscreen or remove it from the note.
You can also ask for it. In chat, "pull these posts out of my note into a table" builds the table from what's in the note and drops it into the page where the list was — the list is replaced by the live table, and the writing around it stays as it is. Claude and other connected agents do the same thing through the Eden tools. The rule they follow is the one worth using yourself: repeating records that share fields (posts, hooks, tasks, links) belong in the table, and the thinking around them — the strategy, the analysis, what to do next — stays as prose in the note.
Every block in a note has a handle in the left gutter — the six dots that appear when you hover. Drag it to move the block, or click it for Copy and Delete. That's how you remove a plain table (or any block) from a note. For an embedded table or note, the same menu also offers Turn into link, which collapses the card back into the small inline link it grew out of — right-click the card for the same option.
Removing the block — or deleting the note itself — never deletes the table. It's a real Library item, and it stays in your Library either way.
On mobile, the note shows the table as a tappable preview card with its title and first few rows. Tap it to open the full table.
Chat can read it too: when Eve or a connected agent reads the note, it sees the embedded table and can open it to work with the rows.
Sharing and duplicating a note that has a table in it
Share the note (or the board it sits on) and whoever opens the link sees the table itself, with its real rows. They don't need an Eden account. What they can do with it follows the note: a public link or a view invite is read-only, and someone you invited to edit the note can edit the table's rows and cells too. Naming the table and changing its columns stays with your workspace members.
When they hit Duplicate, the table comes with the note. Their copy gets its own table in their Library, filled with the rows as they were at that moment, and their note points at their copy. The note lands on the board they picked; the table lands in their Library, where they can place it on a board later if they want. Nothing they do to their copy touches yours.
Duplicating inside your own account works differently on purpose: the copy points at the same live table instead of making a second one, the same way an item can sit on more than one board.
Ask Eve to create or update one
A brand-new table shows a Build with AI card next to the starter templates. Click it and chat opens with the table attached — describe what you want to track ("a content calendar with status and publish date") and Eve sets up the columns and rows in that table while you watch. You can keep refining in the same conversation.
Chat can also build a new table or update an existing one for you. For a new table, describe what you want tracked and Eve sets up the columns and seeds the rows. For an existing table, identify it and ask for something like "add these ten hooks to my hook bank" or "mark the launch task done." Eve reads the existing columns and updates only the rows you requested.
Export
Open the table's ⋯ menu and choose Export CSV to download the table as a spreadsheet file.
Where to go next
- For how boards and their grids work, read creating your first board.
- For splitting a board into areas, read using sections.
Documents vs tables
Documents are for thinking. Tables are for tracking. Here is how to tell which one a piece of work needs, and how the two work together.
Creating your first board
Create a board, add your first sources, then choose grid view for a swipe file or freeform canvas for a spatial creative project.
Sorting a board
The four sort modes available now, what each one is good for, and which features are still coming.
Email us. A real person reads every message.
Tell us what you tried and where you got stuck. We answer within one business day.
[email protected]